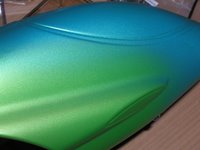
Well I am waiting for the crystal for my receiver, it still didn't come in the mail. I was impatient so I drove up to 2 of my local hobby stores looking for that crystal..no luck. I did however buy some supplies to paint my canopy. I grabbed some primer and couple of bottles of airbrush paint and some datail masking tape 1/8" in width.
I had already trimmed the canopy flashing that is left over from the molding process. The next step is to scuff the surface with steel wool, or scotchbrite. Once the surface was scuffed I wiped it down with alcohol to remove the dust, I applied 2 coats of grey primer and let dry. I then wet sanded with 600 grit sandpaper. Now for the fun stuff. I happen to have an air brush and compressor so that was money I didn't have to spend. I applied a basr coat of yellow/green pearl and let that dry. I then followed up with a teal pearl fade from the nose forward and up the center. I am no pro with the airbrush but I am pleased with the result. Tomorrow I will be sealing it with multiple coats of clear so that it shines. I might try some accents with the airbrush prior to the clear if I can get the airbrush tuned properly.
Money in the pit
$38.75 Paints and supplies from Hobbytown
$39.69 color shift paints from Countdown Hobbies
sub total: $78.44
Total so far: $1532.39
Tech.ses.sion --Compulsive preoccupation with a fixed idea or an unwanted feeling or emotion, often accompanied by symptoms of euphoria brought on by technology.
This blog will contain posts related to what I am currently wasting money on, what I plan to be wasting money on, and what I wish I could be wasting money on, usually centered on or around technology.
Friday, September 01, 2006
T-Rex - Tail servo and boom install
I finally received my Futaba 7CHP radio in the mail on Wednesday. In a previous post I mentioned that I am a dumbass, well would you believe that the only thing that I need is that receiver crystal that I ordered before I ordered my Radio....Grrrrr. A $12 part is preventing me from trimming this bad boy and getting it in the air. Oh well it's in the mail on it's way. Lesson learned.
As the title of this post states I will show you some pics and and a brief summary of how my tail servo install went. Well as I have stated before the instruction manual sucks. It never makes mention of how to install the tail servo, so I had to call on the experts at helifreaks.com. My tail servo is the Futaba s9650, it works great with the futaba GY401 Gyro and both are the best for the tail setup for the T-Rex.
The general idea for the proper setup of the tail servo is to have servo arm, in this case the servo disc, be in line with the pushrod race that is built into the horizontal tail fin mount and the tail pitch ball link. (I know that was a mouthfull) In order to do this the servo needs to be on an angle. The orientation of the servo mounts themselves is very important as if you have them upside down the servo horn is too far away from the boom. It took me quite a few tries to get it right. One more note, I used the supplied rubber grommits and metal sleeves with the mount screws that came with the kit.
Subscribe to:
Posts (Atom)